- Exterior latex house paint doesn't work very well on a boat (I repainted it with oil paint after the latex started peeling off).
- Make sure wood filler is water proof once it dries. Perhaps bondo would have been better to use...
- A 12ft boat isn't very big. Mine only holds 3 people (I haven't tried 4 yet, but 3 is pretty crowded).
- Backing the boat into the water is much easier than carrying the boat to/from the water.
- I need to redesign my sail because my current sail puts too much stress on the mast.
- Unless you have all the right sailing hardware (for the ropes, etc.) it's a lot of work!
- I need to get some sort of motor (for times when there's no wind). I'm looking into getting an electric trolling motor.
Thursday, October 04, 2007
What I've Learned...
This has been a very busy summer for us and we've only managed to take the boat out twice so far. Our second time out on the water was a bit scary due to the gusty winds... Anyway, having spent some time in the boat now, I've made a list of things that I've learned:


Sunday, August 12, 2007
The Maiden Voyage
This morning we set sail with the Nellie Sue on her maiden voyage on Chickamauga Lake. The wind wasn't very strong so we didn't go very fast but we did manage to get out in the middle of the lake where we jumped in and swam. The heat index for today was 108 degrees, so the water felt VERY refreshing!
After our swim, we had a picnic lunch and sailed back to the beach from wenst we saileth. Here are a few more still pictures of our sailing trip.


Wednesday, August 08, 2007
It's Finally Finished!
 Tonight we pulled the boat out onto the lawn and assembled the mast & sail for the very first time! I wanted to make sure everything worked the way it was supposed to and that I had all the correct parts before we hit the water...
 It really does look like a sailboat now! Maybe not necessarily like the stereotypical triangular sail sailboat, but nevertheless I am still very proud of my little boat!
 Earlier this evening I went to go check out a trailer that was for sale -- I'll probably end up buying it. Tomorrow I'm getting a trailer hitch installed on my car, so hopefully by this weekend I'll be ready and equipped to go sailing!
If you're interested in watching the maiden voyage with me, just send me an email and I'll let you know when and where to meet.
Monday, August 06, 2007
Registration, Rudder and Tiller
 Woohooo! My boat is officially registered and legal to be out on the open water! With the registration process and rudder completed, it's essentially finished!
 On Friday I left work early and swung by the Tag & Title office. After waiting in line for about 20 minutes with people who were standing just a little bit too close to me, I finally was able to do my registration paperwork and pay the tax fees - $2. Since it's a homemade boat, there's actually no sales tax to pay! The $2 was to cover the processing fees. :)
So then I had to mail in a check for $28 along with the registration papers to get my 3-year boat license and registration card. But until then I can still legally go boating. I just have to keep my registration receipt with me. And again I say, "Woohooo!" . :)

 On Sunday I finished building & painting the rudder and tiller. I had to fabricate some kind of hinge mechanism for the rudder which I made from pieces of metal strips which I bent into shape with a vice and a hammer. It was tough work, but it turned out very well!
 I then attached nylon rope cleats to the sides of the boat, and some metal rings to the back of the boat. The rings are to either tow my little inflatable raft behind me, or to tie the boat down during transportation.
Tuesday, July 31, 2007
Rudder & Tiller
 Yesterday I painted the rudder (first coat) and made a tiller -- the long handle connected to the rudder that steers the boat. I didn't have any clear instructions on how to make the tiller, so I did some research online and saw a variety of styles. So I decided to take the sturdy but yet easy-to-build rout. It's not necessarily pretty, but it will do the job.
The fork part of the tiller will go around the top part of the rudder and will pivot on a pin so I can raise and lower the handle to the desired height. I now just need to figure out how to attach the rudder to the boat...
Here are a couple photos of the boat in it's current state, the daggarboard on the wall, and the 4 new life jackets. Janell and I plan to get nicer life jackets for the two us. These standard orange boxy ones are just the cheep loaner life jackets for guests. :)


Sunday, July 29, 2007
Building the Sail
Today I painted another coat of paint to the inside of the boat, made a few additions to the mast components, and built the sail! I'm so excited now! I could practically drop it in the water today and go sailing... but I do need to connect the rudder and finish getting the boat registered first.
To make the sail, I took a 12'x12' sheet of 3mil plastic and stretched it out on the garage floor, taping the corners down with duct tape. Then I measured out all the sides of the sail, and taped the rope into place. Then I folded the plastic over the rope and ran a layer of duct tape along the seam -- front and back.


Then I added reinforcement strips of duct tape within the sail area, and reinforced the corners. I'm quite impressed with how it turned out. It doesn't look bad at all, especially considering that it's just plastic and duct tape! .... :)
To make the sail, I took a 12'x12' sheet of 3mil plastic and stretched it out on the garage floor, taping the corners down with duct tape. Then I measured out all the sides of the sail, and taped the rope into place. Then I folded the plastic over the rope and ran a layer of duct tape along the seam -- front and back.


Then I added reinforcement strips of duct tape within the sail area, and reinforced the corners. I'm quite impressed with how it turned out. It doesn't look bad at all, especially considering that it's just plastic and duct tape! .... :)
Thursday, July 26, 2007
Thank You!
 I just wanted to say a special Thank You to those of you who have been faithfully following my progress over the past 9 months. Your comments have been very encouraging to me and have kept me continually moving forward. It would have been a much longer process without you!
You have an open invitation to go sailing with me any time (once the boat is finished of course)! . :)
Boat Registration [part 2]

Woohoo! I now have the Hull Identification Numbers for my boat! Now I just need to swing by the DMV and finish up the registration process and get this thing out on the lake. I'm getting so close I can almost smell the fishy water. Mmmmmm.... :)
However, I still need to:
- make a sail
- install all the necessary hardware on the mast
- finish up & connect the rudder
- paint the final coat on the boat
Monday, July 09, 2007
Boat Registration [part 1]
I just got off the phone with the Tennessee Wildlife Enforcement Agency (TWEA) and in typical government fashion I was transfered to a new person about 7 times (explaining why I'm calling each time) before I finally reached the correct person, only to get their voicemail!!! Grrrrrr!
Apparently to register a homemade boat (without a bill of sale) you have to go through their main office in Nashville. They assign you a hull number and then send the information to the Chattanooga office who then sends someone out to inspect the boat. Or maybe you have to go to them... not sure... Then after filling out all the required forms with them, you have to jump through the DMV's hoops (i think). *sigh*
I finally got a call from the guy in Nashville who emailed me a form to fill out. I did, and it is now in the mail. That wasn't too difficult. I just hope the rest of the registration process will be as painless!
Apparently to register a homemade boat (without a bill of sale) you have to go through their main office in Nashville. They assign you a hull number and then send the information to the Chattanooga office who then sends someone out to inspect the boat. Or maybe you have to go to them... not sure... Then after filling out all the required forms with them, you have to jump through the DMV's hoops (i think). *sigh*
[a couple hours later...]
I finally got a call from the guy in Nashville who emailed me a form to fill out. I did, and it is now in the mail. That wasn't too difficult. I just hope the rest of the registration process will be as painless!
Sunday, July 08, 2007
And Then There Was Color
 OK, so the maiden voyage hasn't happened yet...
But, I finally put a coat of color on the boat! It feels like it's getting so close now. I also painted the inside of the boat and the top of the bow. I'll post pictures of that after the paint dries and I can flip it over again.

I also cut out and glued the layers of plywood together to build the rudder. Now I just need to make the tiller (for the rudder) and make the sail... Oh, and register the boat.
P.S. I now also have life jackets!
Oh, and "happy 4th of July week" to all you Americans who care. In my previous post I mentioned that it was Memorial Day, so thought it was only fair to also mention the 4th in this one. :)
Friday, May 25, 2007
Paint It White
This week I put on the base coat of white exterior latex paint. I read somewhere that exterior latex paint was as good as (or better than) oil-based paint for boats, so I thought I'd give it a shot. Once it dries it becomes as waterproof as the oil based paint, and will actually last longer because it won't dry out and crack like oil paint will.


This is Memorial Day weekend, so I might actually shoot for a maiden voyage...
Stay tuned.
P.S. This is the color-scheme we're thinking of painting our boat.


This is Memorial Day weekend, so I might actually shoot for a maiden voyage...
Stay tuned.
P.S. This is the color-scheme we're thinking of painting our boat.

Monday, April 23, 2007
Daggerboard and Mast

...but maybe that's a good thing because I've been making good progress! This Spring weather has been awesome (except for a week or so ago when it got down into the 20's and killed all our baby peaches and other flowering plants).
Since my last post I:
~ Filled cracks and holes with latex caulking and wood filler.
~ Sanded down rough edges with my Drimmel tool.
~ Built the daggerboard and daggerboard handle.
~ Shaped the mast pieces (by using a hand planer to make the the mast narrower at the top and adding pieces of wood, canvas and epoxy to make it thicker at the base).
I am guessing I have about 2 more weeks worth of work before the boat is ready for it's maiden voyage! :)


Friday, April 13, 2007
Day "whatever"
I've been very bad at documenting my progress on the boat and have done quite a bit of work since my last post... I don't know where to begin.
The cold weather of winter kept me in-doors for several months and when it finally started getting warm again I started working as fast and efficiently as I could, and in the excitement I forgot to post pictures! Oh well, I think there are only 2 or 3 people who are actually following this blog. =)
(pssst! Post a comment so I'll know who's appreciating my hard work.)
Ok, here are some recent photos of the boat.

Above: Rear seat and storage compartment.


Above: I wasn't following the plans and had to build the bow twice... (before and after)


Above: Me demonstrating how big (or small) the boat is.


Above: The skeeg and rub rails. Polyurethane foam to seal all the cracks around the seats, etc.
The cold weather of winter kept me in-doors for several months and when it finally started getting warm again I started working as fast and efficiently as I could, and in the excitement I forgot to post pictures! Oh well, I think there are only 2 or 3 people who are actually following this blog. =)
(pssst! Post a comment so I'll know who's appreciating my hard work.)
Ok, here are some recent photos of the boat.

Above: Rear seat and storage compartment.


Above: I wasn't following the plans and had to build the bow twice... (before and after)


Above: Me demonstrating how big (or small) the boat is.


Above: The skeeg and rub rails. Polyurethane foam to seal all the cracks around the seats, etc.
Friday, February 23, 2007
I Haven't Given Up!
Several of you have told me that you've noticed that progress on the boat seems to have stopped... No, I haven't given up on my boat project. Sadly it is still winter here in Tennessee and my little workshop has no heat so I've put things on hold momentarily. The past several weeks have been near or below freezing at night and the workshop doesn't heat up much during the day.
Trust me, the first warm day we get and I'll be out there! In fact today was almost warm enough...
~E
Trust me, the first warm day we get and I'll be out there! In fact today was almost warm enough...
~E
Wednesday, January 17, 2007
Day 18 - Rails and Seat
On Sunday the weather was unusually warm for this time of winter. It was actually up in the 70's! ...so I decided to spend some time working on my boat.
 It's hard to believe that it's already been nearly a month since I last tinkered on the boat. The holidays really threw a wrench in the work flow... but now things are slowing down once again and I am able to find some free time to "play".
So anyway, on Sunday I decided to cut out the middle seat and work on attaching a few more rub rails to the bottom and sides of the boat. After cutting out the seat I discovered that my measurements had been somewhat incorrect, so I had to make a couple m ore cuts. Luckily it was still usable so it wasn't a total failure. I glued and screwed some small one-by's to the underside of the seat to add a little strength and then fastened the seat to the boat.
 Then I cut a couple pieces of molding and filed down the ends to smooth them off before gluing and screwing them to the bottom of the boat. These rails will not only add more rigidity to the bottom of the boat, but will also protect it against rocks or logs, etc... I also added some small rails along the side... more for looks than for anything else.

Yesterday I went out to take some photos of the boat (around 5:30pm) and the temperature inside my workshop was 35 degrees -- two days ago it was in the low to mid 70s.
~E
 It's hard to believe that it's already been nearly a month since I last tinkered on the boat. The holidays really threw a wrench in the work flow... but now things are slowing down once again and I am able to find some free time to "play".
So anyway, on Sunday I decided to cut out the middle seat and work on attaching a few more rub rails to the bottom and sides of the boat. After cutting out the seat I discovered that my measurements had been somewhat incorrect, so I had to make a couple m
 ore cuts. Luckily it was still usable so it wasn't a total failure. I glued and screwed some small one-by's to the underside of the seat to add a little strength and then fastened the seat to the boat.
 Then I cut a couple pieces of molding and filed down the ends to smooth them off before gluing and screwing them to the bottom of the boat. These rails will not only add more rigidity to the bottom of the boat, but will also protect it against rocks or logs, etc... I also added some small rails along the side... more for looks than for anything else.
Yesterday I went out to take some photos of the boat (around 5:30pm) and the temperature inside my workshop was 35 degrees -- two days ago it was in the low to mid 70s.
~E
Friday, December 01, 2006
Day 17 - Rub Rails (cont.)


Last night I spent a couple hours finishing up the main rub rails and tracing out the pattern for the middle seat. Earlier, I decided to make my rub rails out of whatever was conveniently available, and in this case it was 8 ft long 1" x 2" strips which I cut down the middle. Because a "1x2" from the store isn't exactly 1" by 2", the new rails ended up being about 3/4" on each side.
I fastened the rub rails to the outside of the 1/4" body with screws. The screws were slightly too long so the tips poked out the other side... I accidentally cut myself last week on one of these little sharp screw tips. So I ground off the tips with a grinder bit and my electric drill.
I also connected two "knees" in the rear of the boat. These "knees" provide some stability and strength to the corners and seams as well as adding a nice aesthetic touch.
~E
Friday, November 17, 2006
Day 16 - Rub Rails & Such
The other night I worked on the boat for a couple hours (I'll post photos soon). I added 8 foot strips of wood on the top outside edges of the boat for rub rails and to give the 1/4" plywood some strength & stability. I also added a front "breast hook" and some "knees" in the back corners. These also add strength & stability, plus they make the boat look nicer to boot! :)
~E
~E
Sunday, November 05, 2006
Day 15 - And The Glassing Continues...
 Today was Sunday and so I was able to work for a couple hours on the boat. I had to swing by Lowes to pick up some more epoxy and fiberglass cloth. I was able to finish all of the outside seams except for the ones around the back vertical panel (transom). I also brushed on a good thick coat of epoxy on the rest of the bottom panels. This will help strengthen the wood and keep it watertight. Between my sailboat project and our other house projects* I've been keeping quite busy lately.
*The wife mowed the lawn while I worked on my boat, and then later we worked on weather stripping all the doors and windows of the house, and also continued working on the 'guest bathroom renovation project'. The in-laws are coming next week.
:)
Friday, November 03, 2006
Day 14 - Fiberglassing, Cont.
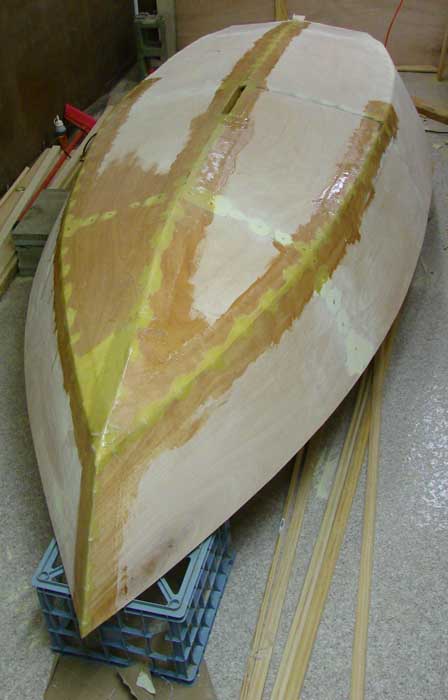 I worked for another hour this evening and put on 6 more strips of fiberglass until I ran out of epoxy. Will continue the glassing after I get some more fiberglass cloth and epoxy (probably on Sunday).
~E
Subscribe to:
Posts (Atom)